DIY Keychain Ideas: Creative Projects You Can Make at Home

A DIY keychain is more than just a place to hang your keys, it’s a small, portable expression of creativity. Whether you’re personalizing your own accessories or looking for thoughtful handmade gifts, DIY keychains offer endless opportunities for fun, functionality, and flair. From simple beadwork to intricate resin designs, crafting your own keychain is a satisfying project that anyone can enjoy. Why Make Your Own Keychain? Making your own keychain gives you the freedom to design something that reflects your style, personality, or mood. DIY keychains are also: Whether you’re a seasoned crafter or just getting started, there’s a project to suit every skill level. Materials You Can Use for DIY Keychains Part of the charm of DIY keychains is how flexible the materials can be. Some of the most common and creative options include: With just a few basic tools like scissors, pliers, glue, and key rings, you can turn everyday objects into cute and creative keychains. 10 Creative DIY Keychain Ideas 1. Resin Name Keychain Create a glossy, personalized keychain using resin and silicone molds. This project is perfect for gifts, business merch, or simply expressing your style with initials, names, or fun shapes embedded with pretty details. Materials: Silicone mold, epoxy/UV resin, glitter, dried flowers, keyring, drillSteps: 2. Beaded Initial Keychain This colorful and customizable keychain idea is super beginner-friendly, great for kids, group crafts, or personalized gifts. You can spell out names or initials using alphabet beads and playful accents. Materials: Alphabet beads, round beads, cord or wire, keyringSteps: 3. Leather Tassel Keychain A leather tassel keychain adds a touch of minimalist style and elegance to your keys or bags. It’s quick to make and works beautifully as a thoughtful handmade gift. Materials: Faux/genuine leather, glue, scissors, keyring, optional capSteps: 4. Mini Macrame Keychain Add a touch of boho charm with a miniature macrame keychain. This project is great for anyone who loves knotting and wants to explore the relaxing art of macrame in a compact form. Materials: Macrame cord, keyring, scissors, optional beadsSteps: 5. Embroidered Felt Keychain This cozy, colorful idea allows you to combine simple sewing and creative embroidery. Personalize your felt design with initials, symbols, or cute shapes, it’s soft, charming, and beginner-friendly. Materials: Felt sheets, embroidery floss, stuffing, needle, scissors, keyringSteps: 6. Shrink Plastic Art Keychain Perfect for artists and doodlers, shrink plastic keychains turn your drawings into durable mini charms. Great for showcasing characters, logos, or personalized art. Materials: Shrink plastic sheets, permanent markers or colored pencils, scissors, hole punch, oven, keyringSteps: Also Read: Where to Make Custom Keychain in Singapore 7. Polymer Clay Charm Keychain Make cute, tiny sculptures, like animals, food, or emojis, using colorful polymer clay. This is a fun and flexible project ideal for crafters who enjoy miniature modeling. Materials: Polymer clay, eye pins, oven, glaze (optional), keyringSteps: 8. Wooden Disc Painted Keychain Turn small wooden discs into hand-painted art pieces. These keychains are rustic, lightweight, and great for showcasing quotes, symbols, or aesthetic patterns. Materials: Wooden discs, acrylic paint, brush, clear varnish or resin, drill, keyringSteps: 9. Fabric Scrap Patchwork Keychain Turn leftover fabric into a mini quilted design! This sustainable keychain idea is ideal for sewing lovers and perfect for using up colorful scraps. Materials: Fabric scraps, interfacing or batting, needle and thread or sewing machine, scissors, keyring tab, keyringSteps: 10. Paracord Survival Keychain This durable and practical keychain is a favorite among hikers and campers. It’s not just a keychain, it’s emergency gear that unravels into a useful cord when needed. Materials: Paracord, keyring, scissors, lighterSteps: DIY Keychains for Different Occasions A handmade keychain can be the perfect gift or keepsake for special events. Here are some fun ways to theme your DIY keychain projects: These small gifts are memorable, functional, and easy to customize for any event. Tips for Successful DIY Keychain Projects To make sure your keychains turn out both beautiful and long-lasting, keep these tips in mind: Conclusion Making a DIY keychain is a simple yet creative way to express yourself, craft personalized gifts, or even start a small business. With so many materials and styles to choose from, there’s a project for every skill level and taste. Whether you’re crafting alone or with friends and family, DIY keychains are a fun and fulfilling activity that turns everyday items into something uniquely yours. Not into crafting but love the look of handmade keychains? Explore our ready-made personalized custom keychains at Switts, crafted with care and ready to impress.
What Is a Resin Keychain and How to Make It (Step by Step)
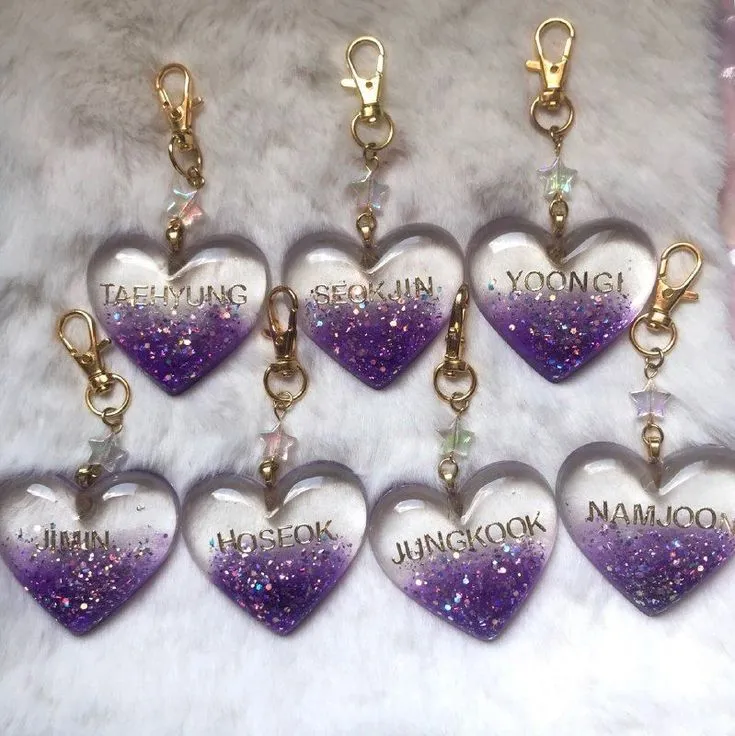
A resin keychain is a small, decorative item made from synthetic resin typically epoxy or UV resin that is shaped, cured, and then attached to a keyring. These keychains are loved for their glossy finish, creative flexibility, and personalized appeal. Whether used as an everyday accessory or given as a handmade gift, resin keychains are fun to make and easy to customize with colors, glitter, dried flowers, or even tiny photos and charms. What Is Resin? Resin is a liquid compound that hardens into a solid, plastic-like material after a curing process. The two main types used in keychain crafting are epoxy resin and UV resin. Epoxy resin requires mixing two components resin and hardener in a specific ratio and then allowing it to cure for several hours. UV resin, on the other hand, cures quickly under ultraviolet light. Both types create a clear, durable, and glass-like finish, perfect for small items like keychains. Why People Love Resin Keychains One reason resin keychains are so popular is because of their visual appeal. They have a glossy, high-end look that mimics glass but is much more resistant to breakage. People love that resin can be tinted, layered, and embedded with various materials. Additionally, these keychains are a perfect blend of creativity and functionality. They’re not just beautiful they’re also durable and useful. On top of that, they make great personalized gifts or small-batch products for craft businesses and online shops. Materials Needed to Make a Resin Keychain To get started with making resin keychains, you’ll need the following materials: Having a clean and well-ventilated workspace is also essential for safety and precision. Step-by-Step Guide to Making a Resin Keychain 1. Prepare Your Workspace and Mold Before handling any resin, set up your workspace in a well-ventilated area preferably near an open window or under a fan. Cover your working surface with wax paper, plastic sheet, or silicone mat to protect against spills, since resin can be very sticky and difficult to clean. Organize all your tools and decorative elements within easy reach. Select a clean silicone mold and ensure it’s free from dust or lint, as even the smallest debris can show through in the final product. If you plan to make multiple keychains, consider laying out several molds in advance. 2. Mix the Resin Wear gloves and a mask for protection, especially when using epoxy resin. Carefully measure equal parts of resin and hardener (typically a 1:1 ratio, but always follow the label directions). Pour them into a mixing cup and stir slowly but thoroughly for 3 to 5 minutes. Stirring too quickly can introduce unwanted bubbles, so be patient. Make sure the mixture becomes clear and uniform, with no visible streaks. If using UV resin, you can skip the mixing step and proceed directly to pouring. 3. Pour the First Layer Pour a small amount of resin into the bottom of the mold just enough to cover the base. Use a toothpick or craft stick to spread the resin evenly across the mold’s surface and into corners. This initial layer helps anchor decorations in place. At this stage, gently pass a lighter or heat gun over the surface to pop air bubbles. Hold the flame or heat source just above the resin (don’t touch it), and move it slowly back and forth to avoid overheating. 4. Add Decorations Now comes the creative part! Use tweezers to carefully place your chosen decorations—such as glitter, dried flowers, alphabet beads, charms, or foil flakes into the resin. Take your time arranging them in a visually pleasing layout. Make sure each item is fully pressed into the resin layer so it stays in place. For 3D objects or layered designs, you may want to add items one at a time with resin in between, letting each layer partially cure before continuing. 5. Pour the Final Layer Once your decorations are arranged, pour another layer of resin to fill the mold to the top. Be careful not to overfill, as resin may spill over and distort the shape. Again, use a heat source to remove surface bubbles. You can also gently tap the mold on the table to help bubbles rise. If desired, you can sprinkle a bit of glitter or apply a top coat pigment for an extra pop of color or shimmer. 6. Cure the Resin Set your mold aside in a level, dust-free area. Cover it with a plastic container or box to protect from airborne particles and allow it to cure undisturbed. Epoxy resin typically requires 24 to 48 hours to fully harden, depending on room temperature and humidity. For UV resin, curing is much quicker simply place the mold under a UV lamp for 2 to 5 minutes or leave it in direct sunlight for up to 30 minutes, rotating it if needed for even exposure. 7. Finish the Keychain Once the resin is fully cured, gently remove the piece from the mold. If the edges are rough or have overflow, sand them down using fine-grit sandpaper or a nail file until smooth. To make your resin piece into a keychain, drill a small hole using a hand drill or pin vise. Screw in a metal eye pin or insert a jump ring through the hole. Attach the keyring or clasp of your choice, and your handmade resin keychain is ready to use, gift, or sell. Also Read: Where to Make Custom Keychain in Singapore Tips for Best Results To get the cleanest finish, stir the resin slowly to avoid bubbles, and always work in layers if you’re using multiple decorative elements. If bubbles persist, using a lighter or heat gun can help bring them to the surface. You can also seal delicate decorations like dried flowers with a thin layer of resin first to prevent them from discoloring. Safety Precautions When Working With Resin Although resin crafting is fun, it’s important to follow safety practices. Always wear gloves and work in a well-ventilated area, especially when working
